“Fold, float, and set sail with a simple paper boat!”
Introduction
To make a paper boat, you will need a square piece of paper. Follow these simple steps to create your own paper boat.
Materials Needed for Making a Paper Boat
Making a paper boat is a fun and simple craft that can be enjoyed by people of all ages. Whether you’re looking for a rainy day activity or just want to try your hand at something new, making a paper boat is a great way to get creative. In this article, we’ll walk you through the process of making a paper boat step by step.
Before we get started, let’s go over the materials you’ll need to make a paper boat. The good news is that you probably already have everything you need right at home. To make a paper boat, you’ll need a sheet of paper, a pair of scissors, and a pencil. That’s it!
Now that you have your materials ready, let’s move on to the next step in making a paper boat.
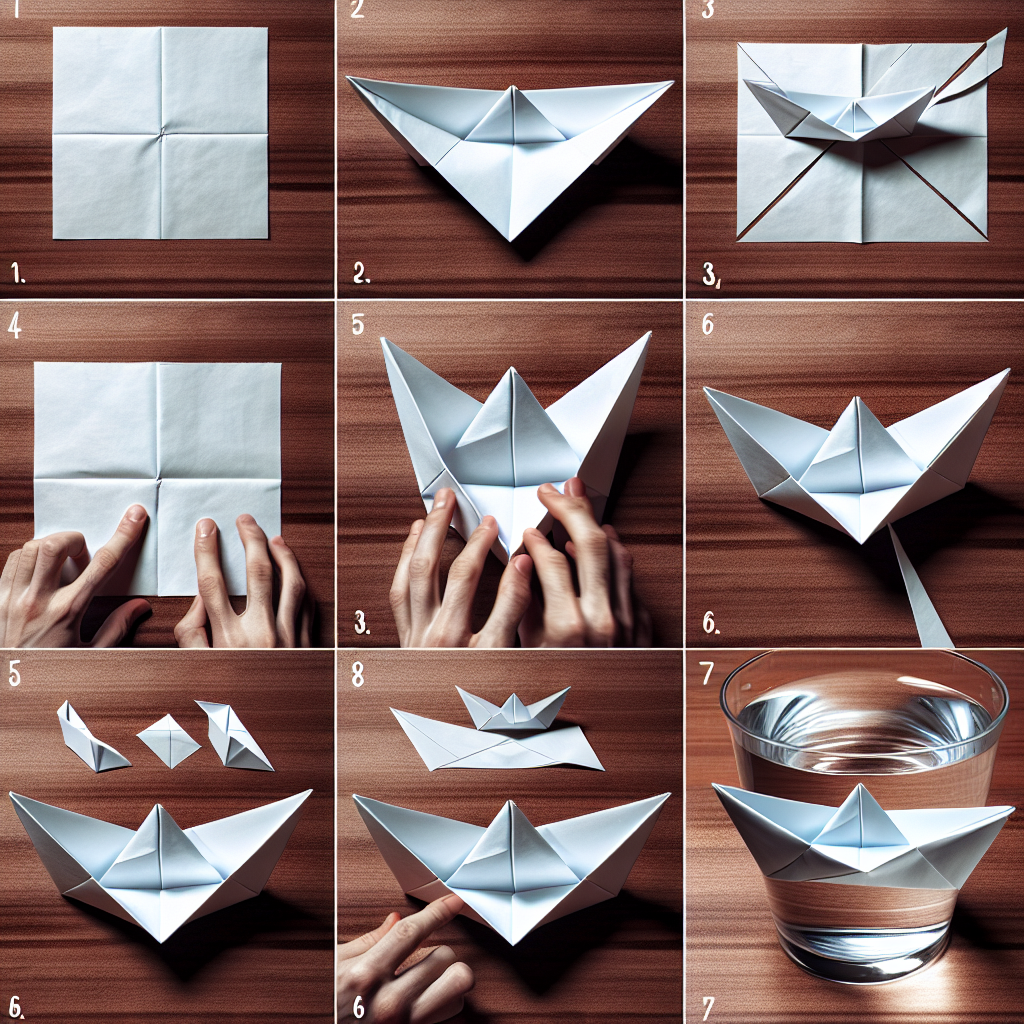
Section: Step-by-Step Instructions for Making a Paper Boat
Start by taking your sheet of paper and folding it in half lengthwise. Make sure to crease the fold well so that it stays in place. Next, unfold the paper and fold the top corners down to the center crease. This will create a triangle shape at the top of the paper.
Once you have folded the top corners down, fold the bottom edge of the paper up to meet the bottom of the triangle shape you created in the previous step. This will create a long, skinny rectangle shape.
Now, fold the paper in half along the center crease so that the bottom edge meets the top edge. You should now have a smaller rectangle shape with a triangle shape at the top.
Next, take your scissors and cut along the bottom edge of the rectangle shape, stopping about halfway up. Be careful not to cut all the way through the paper!
After you have made the cut, gently open up the paper to reveal the bottom of your paper boat. You can now gently push the sides of the boat outwards to create a more rounded shape.
Finally, use your pencil to gently push down on the bottom of the boat to create a flat surface. This will help your paper boat float more easily in water.
And there you have it! You have successfully made a paper boat.
Section: Tips for Making a Paper Boat
If you want to add some extra flair to your paper boat, consider decorating it with markers, stickers, or even glitter. You can also experiment with different sizes of paper to create boats of varying sizes.
When it comes to actually floating your paper boat, be sure to use it in a shallow container of water, such as a bathtub or sink. This will help prevent your paper boat from getting lost or damaged in deeper water.
Making a paper boat is a fun and easy craft that can be enjoyed by people of all ages. Whether you’re looking for a creative way to pass the time or just want to try something new, making a paper boat is a great activity to try. So grab your materials and get started on making your very own paper boat today!
Step-by-Step Instructions for Making a Paper Boat
Paper boats are a classic childhood craft that never goes out of style. Whether you’re looking for a fun activity to do with your kids on a rainy day or just want to relive some nostalgic memories, making a paper boat is a simple and enjoyable project that anyone can do. In this article, we’ll walk you through the step-by-step process of making a paper boat, so grab some paper and let’s get started!
To begin, you’ll need a square piece of paper. If you don’t have any square paper on hand, you can easily make your own by folding a rectangular piece of paper diagonally and trimming off the excess. Once you have your square piece of paper, lay it flat on a table or other flat surface.
Next, fold the paper in half horizontally, creasing it well to create a sharp fold. Then, unfold the paper and fold the top two corners down to meet in the middle, creating a triangle shape at the top of the paper. Make sure to crease these folds well to ensure that your paper boat holds its shape.
Now, fold the bottom edge of the paper up to meet the bottom of the triangle shape you created in the previous step. This will create a long, skinny rectangle shape at the bottom of the paper. Once again, crease the fold well to secure it in place.
With the paper still folded in half horizontally, take one of the bottom corners and fold it up towards the top of the paper, creating a small triangle shape at the bottom. Repeat this step on the other side, folding the remaining bottom corner up towards the top of the paper. These triangles will form the base of your paper boat.
Now, flip the paper over and fold the bottom edge up towards the top, creasing it well to create a sharp fold. Then, unfold the paper and gently push the sides in towards each other, collapsing the paper along the creases you’ve made. As you do this, the paper will start to take on a boat-like shape.
Finally, gently pull the two sides of the paper apart to open up your paper boat. You may need to adjust the folds slightly to ensure that the boat sits flat and floats properly in water. And there you have it – a simple paper boat that’s ready to set sail!
Making a paper boat is a fun and easy craft that’s perfect for all ages. Whether you’re a seasoned crafter or just looking for a quick and simple project to pass the time, making a paper boat is a great way to get creative and have some fun. So grab some paper and give it a try – you’ll be amazed at how such a simple craft can bring so much joy!
Tips for Folding a Paper Boat

Paper boats are a classic childhood craft that never goes out of style. Whether you’re looking to entertain your kids on a rainy day or simply want to relive some nostalgic memories, making a paper boat is a fun and easy activity that anyone can enjoy. In this article, we’ll walk you through the steps to create your very own paper boat.
To start, you’ll need a square piece of paper. You can use any type of paper you have on hand, whether it’s plain white printer paper or colorful origami paper. The size of the paper will determine the size of your boat, so feel free to experiment with different sizes to see what works best for you.
Begin by folding the paper in half diagonally to create a triangle. Make sure the edges line up perfectly to ensure a clean fold. Next, take the bottom corners of the triangle and fold them up to meet at the top point, creating a smaller triangle. This will be the base of your boat.
Now, take the bottom corners of the triangle and fold them up towards the top point, creating a smaller triangle. This will be the base of your boat. Next, fold the two bottom corners of the triangle up towards the top point, creating a smaller triangle. This will be the base of your boat.
Once you have your base triangle, flip the paper over and fold the two bottom corners up towards the top point again. This will create a diamond shape with a small triangle at the top. Fold the two bottom corners of the diamond in towards the center line, creating a smaller diamond shape.
Now, take the bottom edge of the paper and fold it up towards the top edge, creating a straight line across the bottom of the diamond. This will create the bottom of your boat. Finally, gently pull apart the two sides of the boat to create a three-dimensional shape, with the bottom flat and the sides standing up.
And there you have it – your very own paper boat! Feel free to decorate your boat with markers or stickers to make it your own. You can also experiment with different sizes and types of paper to create a fleet of boats to play with.
Making a paper boat is a simple and enjoyable activity that can be done by people of all ages. It’s a great way to unleash your creativity and have some fun, whether you’re by yourself or with friends and family. So the next time you’re looking for a quick and easy craft project, grab a piece of paper and start folding – you’ll be amazed at what you can create.
Decorating Ideas for Paper Boats
Paper boats are a classic childhood craft that never goes out of style. Whether you’re making them with your kids or just looking for a fun and creative way to pass the time, decorating your paper boats can take them to the next level. In this article, we’ll explore some creative ideas for decorating your paper boats to make them truly unique and eye-catching.
One simple way to decorate your paper boat is by using markers or colored pencils to add designs and patterns. You can draw stripes, polka dots, or even intricate designs to make your boat stand out. If you’re feeling extra creative, you can even try your hand at drawing a mini scene on the sail of your boat, like a sunset or a beach scene.
Another fun way to decorate your paper boat is by using stickers. You can find a wide variety of stickers at your local craft store or online, ranging from cute animals to sparkly gems. Simply peel and stick the stickers onto your boat to add a pop of color and personality. You can even mix and match different stickers to create a unique look that reflects your style.
If you’re feeling adventurous, you can try adding some texture to your paper boat by using materials like glitter, sequins, or beads. Simply glue these materials onto your boat to create a sparkling and eye-catching effect. You can even experiment with different textures and colors to create a one-of-a-kind design that will surely impress your friends and family.
For a more natural look, you can try decorating your paper boat with leaves, flowers, or other natural materials. Simply collect some small leaves or flowers from your backyard or a nearby park and glue them onto your boat. This will give your boat a rustic and earthy feel that is perfect for a nature-themed craft project.
If you’re looking for a more whimsical touch, you can try adding some accessories to your paper boat, like mini flags or sails made from fabric scraps. You can also try adding small figurines or toys to your boat to create a fun and playful scene. The possibilities are endless when it comes to decorating your paper boat, so don’t be afraid to get creative and think outside the box.
In conclusion, decorating your paper boat is a fun and creative way to make it truly unique and special. Whether you’re using markers, stickers, glitter, or natural materials, there are endless possibilities for adding your personal touch to your paper boat. So gather your supplies, let your imagination run wild, and get ready to set sail on a crafting adventure that is sure to bring joy and creativity to your day.
Different Types of Paper Boats to Make
Paper boats are a classic childhood craft that never goes out of style. Whether you’re a seasoned paper boat maker or a beginner looking to try your hand at this timeless activity, there are a variety of different types of paper boats you can create. In this article, we’ll explore some of the most popular styles of paper boats and provide step-by-step instructions on how to make them.
One of the simplest and most traditional paper boats to make is the classic origami boat. To create this boat, all you need is a square piece of paper. Start by folding the paper in half diagonally to create a triangle. Then, fold the two bottom corners of the triangle up to meet at the top point. Finally, fold the bottom point of the triangle up to create the boat’s hull. You can also add a small square of paper to the top of the boat to create a sail.
Another popular type of paper boat is the sailboat. To make a sailboat, start by folding a square piece of paper in half diagonally to create a triangle. Then, fold the two bottom corners of the triangle up to meet at the top point. Next, fold the bottom point of the triangle up to create the boat’s hull. To create the sail, cut a small rectangle out of a different color of paper and attach it to a toothpick. Insert the toothpick into the top of the boat to complete your sailboat.
For those looking for a more advanced paper boat project, the steamboat is a fun and challenging option. To make a steamboat, start by folding a square piece of paper in half diagonally to create a triangle. Then, fold the two bottom corners of the triangle up to meet at the top point. Next, fold the bottom point of the triangle up to create the boat’s hull. To create the steamboat’s smokestack, cut a small rectangle out of a different color of paper and roll it into a cylinder. Attach the cylinder to the top of the boat to complete your steamboat.
No matter which type of paper boat you choose to make, the key to success is precision and patience. Take your time with each fold and crease to ensure that your boat turns out just right. And don’t be afraid to get creative with your designs – add embellishments like stickers, markers, or glitter to make your paper boat truly unique.
In conclusion, making paper boats is a fun and rewarding activity that can be enjoyed by crafters of all ages. Whether you’re a beginner looking to try your hand at a simple origami boat or an experienced paper boat maker looking for a new challenge, there are a variety of different types of paper boats you can create. So grab some paper, get folding, and set sail on your paper boat-making adventure!
Fun Activities to Do with Paper Boats
Paper boats are a classic childhood craft that never goes out of style. Whether you’re looking for a fun activity to do with your kids on a rainy day or just want to relive some nostalgic memories, making a paper boat is a simple and enjoyable project that anyone can do. In this article, we’ll walk you through the steps to make your very own paper boat.
To get started, you’ll need a piece of paper. Any type of paper will do, but a square piece works best for making a traditional paper boat. If you don’t have a square piece of paper, you can easily make one by folding a rectangular piece diagonally and trimming off the excess paper.
Once you have your square piece of paper, lay it flat on a table or other flat surface. Fold the paper in half horizontally, creasing it well to create a sharp fold. Then, unfold the paper and fold the top two corners down to meet in the middle, creating a triangle shape at the top of the paper.
Next, fold the bottom edge of the paper up to meet the bottom of the triangle, creating a straight edge along the bottom of the paper. Then, fold the paper in half along the original horizontal crease, bringing the bottom edge up to meet the top edge. You should now have a long, skinny rectangle shape with a triangle at the top.
Now comes the fun part – shaping your paper boat. Hold the paper with the triangle facing up and the open edges facing down. Gently pull the two sides of the paper apart, allowing the bottom edge to pop out and form the base of the boat. Press down on the sides of the boat to create a flat bottom and ensure that it will float properly in water.
To finish your paper boat, fold the two corners of the triangle down to create a sail. You can also add a small piece of tape to secure the sail in place if desired. And there you have it – your very own paper boat ready to set sail!
Paper boats are a great way to spark creativity and imagination in both kids and adults. You can decorate your paper boat with markers, stickers, or even paint to make it unique and personalized. You can also experiment with different sizes and shapes of paper to create a fleet of paper boats to race or display.
Making paper boats is not only a fun and creative activity, but it also teaches valuable skills such as following directions, hand-eye coordination, and spatial awareness. It’s a great way to spend quality time with your children or simply unwind and relax on your own.
So the next time you’re looking for a simple and enjoyable craft project, give making a paper boat a try. It’s a timeless activity that is sure to bring joy and laughter to all who participate. Happy sailing!
History and Significance of Paper Boats
Paper boats have been a popular pastime for children and adults alike for centuries. The simple act of folding a piece of paper into a boat shape and setting it afloat in a body of water can bring joy and wonder to anyone who tries it. But have you ever stopped to think about the history and significance of paper boats?
The origins of paper boats can be traced back to ancient China, where paper was invented around 105 AD by Cai Lun. The Chinese were the first to use paper for various purposes, including writing, wrapping, and even making small boats. These paper boats were often used in religious ceremonies and festivals, symbolizing good luck and prosperity.
As papermaking spread to other parts of the world, so did the tradition of making paper boats. In Japan, paper boats were used in the ancient practice of “tōrō nagashi,” where lanterns and paper boats are set afloat on rivers to guide the spirits of the deceased back to the afterlife. This tradition is still observed in Japan today during the Obon festival.
In Europe, paper boats became a popular children’s toy in the 19th century. Children would fold paper boats and race them in streams and ponds, sparking their imagination and creativity. Paper boats also became a symbol of childhood innocence and playfulness, reminding us of simpler times when a piece of paper could provide hours of entertainment.
Today, paper boats continue to hold a special place in our hearts, evoking feelings of nostalgia and wonder. Making a paper boat is a simple yet satisfying activity that can bring joy to people of all ages. Whether you’re a child playing in a puddle or an adult reminiscing about your own childhood, the act of folding a piece of paper into a boat can transport you to a world of imagination and creativity.
So how exactly do you make a paper boat? The process is surprisingly easy and requires just a few simple steps. Start with a square piece of paper, preferably a lightweight and easy-to-fold material like origami paper or newspaper. Fold the paper in half diagonally to create a triangle, then fold the two bottom corners of the triangle up to meet at the top point. Next, fold the bottom edge of the triangle up to create a straight line across the bottom of the boat. Finally, gently open up the folds to reveal your completed paper boat.
Once you’ve made your paper boat, it’s time to set it afloat. Find a calm body of water, such as a pond or stream, and gently place your boat on the surface. Watch as it glides effortlessly across the water, carried by the gentle currents and breezes. Take a moment to appreciate the simple beauty of your creation and the joy it brings.
In conclusion, paper boats have a rich history and significance that spans cultures and generations. From ancient China to modern-day playgrounds, paper boats have captured our imagination and brought us moments of joy and wonder. So the next time you’re looking for a simple yet meaningful activity, why not try making a paper boat? You never know where it might take you.
Q&A
1. How do you make a paper boat?
To make a paper boat, start with a square piece of paper. Fold it in half diagonally to form a triangle, then fold the two corners of the triangle down to the bottom edge. Flip the paper over and fold the bottom edge up to create the boat’s base. Finally, fold the two corners at the top down to form the boat’s sides.
2. What kind of paper is best for making a paper boat?
Any type of paper can be used to make a paper boat, but thicker paper or cardstock will make a sturdier boat.
3. Can you decorate a paper boat?
Yes, you can decorate a paper boat with markers, stickers, or even paint to make it more colorful and unique.
4. How big should a paper boat be?
The size of a paper boat can vary depending on the size of the paper used. A standard size for a paper boat is around 8.5 x 11 inches.
5. Can a paper boat float in water?
Yes, a properly folded paper boat can float in water. However, it may not be as durable as a boat made from other materials.
6. How can you make a paper boat waterproof?
To make a paper boat waterproof, you can coat it with a layer of clear nail polish or wax to help seal the paper and prevent it from getting soggy.
7. Can you make a paper boat without cutting the paper?
Yes, you can make a paper boat without cutting the paper by simply folding it in the correct way to form the boat shape.
Conclusion
To make a paper boat, follow these steps:
1. Start with a square piece of paper.
2. Fold the paper in half diagonally to form a triangle.
3. Fold the two bottom corners of the triangle up to meet at the top point.
4. Fold the bottom edge of the triangle up to create the boat’s hull.
5. Open up the folds slightly to create the boat shape.
6. Fold the two corners at the top down to create the boat’s bow.
7. Your paper boat is now complete!
In conclusion, making a paper boat is a simple and fun craft activity that can be enjoyed by people of all ages. It is a great way to unleash your creativity and imagination while also learning basic origami techniques. So grab a piece of paper and start folding your own paper boat today!